Using Virtual Machines Part 2

This is second of a 2 part series on using Virtual Machines for LabVIEW development. You can check out part 1 here. Part 1 discusses why we use virtual machines. This article will discuss a little more of the how. I’m not going to give away all my secrets, but hopefully, this will be enough to point you in the right direction. If you have specific questions, please post them in the comments. I got some good questions on Linkedin and in the comments on part 1. Hopefully I’ve answered them all here.
General Strategy
First of all, let’s be clear about our objectives (these are our objectives at SAS, yours may be slightly different):
- Create an isolated environment for each project.
- Allow for portability between machines. (ie. between my development workstation and my laptop)
- Get a VM for a new project up and running as quickly as possible.
Our strategy for achieving all these goals is to create a base VM with some basic common programs installed. Then we clone that and customize it for each project. We have a base VM with no LabVIEW installed (just some basic tools) and then we have a base VM with just the basic LabVIEW IDE for each version of LabVIEW. (ie. We’ll have a Windows10, LV2016, LV2017, etc) We don’t do a lot of RT, FPGA, or TestStand, so our base VMs don’t have those. We install those after we clone the VM if we need them or we clone an existing project that already has them. That keeps the base VMs small.
Licensing
DISCLAIMER: I am not a lawyer, so this is not legal advice. You do need to be aware of the licensing implications of creating a virtual machine, installing a bunch of software on it and then creating clones of it. It is very tempting to think that you could create one VM for a project and then pass it around to all the members of your team. I think if you do that you may run into licensing problems. We make each team member responsible for maintaining their own VMs and making sure all the license keys are registered to them. The standard LabVIEW license is a single user license. Technically, this allows for only 3 installations per user. If you have a VM for each project you will quickly exceed 3. In informal discussions with people at NI, it seems NI is ok with this practice as long as the VM is for a specific user and that person is only running one at a time. It is after all a single user license. As for Windows, a lot depends on what version you have and whether you are an MSDN member or not. If you are using other software, you need to be aware of those licenses as well.
Which Virtualization Program to use?
There are several different virtualization programs out there. The 2 most popular cross-platform ones are VMWare and VirtualBox. For my purposes (use on a Linux workstation and a Windows laptop), I needed a cross-platform solution. There are other solutions that are Linux or Mac specific.
VirtualBox is free. With VMWare, you have to pay for a commercial license, but you can try it for free. I used to use VirtualBox, but was having issues with Windows licensing getting reset when cloning machines, so I switched to VMWare. I think VMWare is a little more polished. The rest of this article revolves around using VMWare, although you could do a lot of the same things in VirtualBox. There are online tutorials about cloning VirtualBox VMs without resetting Windows licensing, but they are rather complicated.
Where to store VMs?
I wanted to be able to use my VMs on both my laptop and workstation so I have been storing them on an external USB 3.0 drive. Storing the VMs on the external drive allows me to easily move them between my workstation and laptop and it also helps me to save storage space on my laptop. Right now I’m using a spinning drive but would like to upgrade to an SSD as I soon as I can find an affordable one or the prices come down. The spinning drive is slow but manageable. I would like to switch over to an SSD not just for the speed but also for reliability. SSDs have no moving parts. With the spinning drive, if you bump it while it is in use, you could cause problems. I did have an issue where one of my VMs got corrupted. Don’t know why, but it could be that.
If you bother to encrypt the hard drive on your laptop (I do) then it is probably worth encrypting the drive with the VMs on it. I often have source code checked out on them and the drives are small, portable, and would be easy to swipe. Currently, I don’t encrypt my drive, but the next time I buy a new hard drive, I plan on using Veracrypt to encrypt the entire external drive, since Veracrypt is cross-platform. I just haven’t done it yet, because it would require moving everything off the drive, encrypting it and then putting everything back. Since I’m looking at buying an SSD in the near future, I figure I will just wait until I buy that.
Creating Initial VMs
There are basically 2 ways to create the initial VM to use for your base VM. One way is to create a VM from scratch and install Windows using an iso. In VMWare, it is pretty straightforward and there are plenty of tutorials online if you get stuck. A quicker way is if you already have a physical machine is to use a free tool from VMWare. It takes a physical machine and converts it into a virtual machine.
Whichever one you use, you want to be conscious of the size of the hard drive. You want to make it as small as possible and yet have enough space to do whatever development you need to do. Somewhere in the 50-100Gb range seems to work well. NOTE: You can expand it later. Also there may be an option to preallocate the entire harddrive space. Don’t do that. We want it to grow as we fill it to save space on the host.
What software do we install?
Before you do anything else with your virtual machine, you will want to install vmware tools. There should be a menu option in vmware to install the tools. Lots of features won’t work without the tools installed.
On our base machine, we typically install a handful of useful utility programs. Most of these are fairly small. To save disk space, you could potentially skip some of these (such as cygwin, winscp, office, etc) and switch back to the host to perform some of these tasks. I just hate constantly switching.
- Git for Windows – We use git for source code control. We mostly use the command line client Gitbash
- TortoiseGit – I like the icon overlays to get a quick idea of what’s been changed. I also occasionally use the LabVIEW diff and merge tools and using Tortoise is easier than the command line. Also sometimes I simply forget the correct command or syntax so it is easier to use the GUI. NOTE: you can setup the diff and merge without actually having the tool installed. It will get installed later when we install LabVIEW).
- Cygwin with ssh – Cygwin lets you run bash scripts on Windows. Also with ssh it allows you to connect to servers and embedded targets to run commands.
- Winscp – this is similar to Filezilla. It does ftp, sftp, scp, etc. It’s useful for transferring files to/from embedded targets.
- Ccleaner – this is helpful to keep the virtual hdd from getting cluttered.
- Nextcloud – This is basically equivalent to Dropbox. Each project has its own Nextcloud folder where we put stuff that doesn’t go into git. For example, manuals and some project management docs.
- Opera – I don’t like Edge, so I usually install Opera. If you are using Windows 7 I highly recommend you install another browser, since IE is basically deprecated and from a security, standpoint is pretty much swiss cheese.
- Lastpass – We use Lastpass to manage passwords, so I also install that. If you are not using a password manager, I highly recommend it. You will not look back.
- Libre Office – for basic word processing functions, etc.
After we have a base machine, then we clone it and install a specific version of LabVIEW (for example 2017). We then use VIPM to install a few common tools that we frequently use, such as:
- DQMH
- AF State pattern actor
- JKI VI Tester
- Internal reuse packages.
Anything else is generally project specific and gets installed after we make a clone of this VM for a specific project. If you want to get really fancy with this and have the paid version of vipm, you can create a VI package configuration (.vipc) file for each project and then install the vipc after you make a clone for a specific project.
Cloning VMs
Cloning VMs is simple, but tedious. It’s easy enough to do by hand, but I do it often enough that I wrote a bash script to do it. I suggest you do the same. Sed works well for the find and replace. The basic process starts from the fact that all the files for a particular VM are in a directory with the name of the VM. It should look something like this:
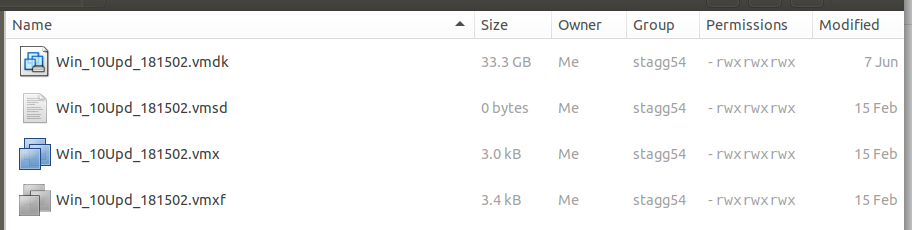
- Make sure the existing VM is properly shutdown (not suspended, but actually shut down)
- Copy directory of the existing VM and rename the folder to the name of the new VM.
- Rename any files in the directory with the new name of the VM. Keep the extensions the same.
- Open the .vmx file in notepad. Find all instances of the old name and replace them with the new name.
- Do the same thing with the .vmxf file
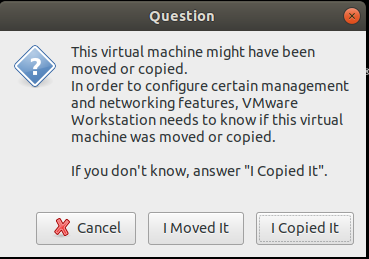
- Open the new vmx file in VMWare and click “I moved it.” If you click “I copied it”, it will come up with new random IDs for the hardware components and Windows licensing will complain.
Managing Disk Space
If you have a separate virtual machine for each project, then disk space quickly becomes an issue. Here are some tips:
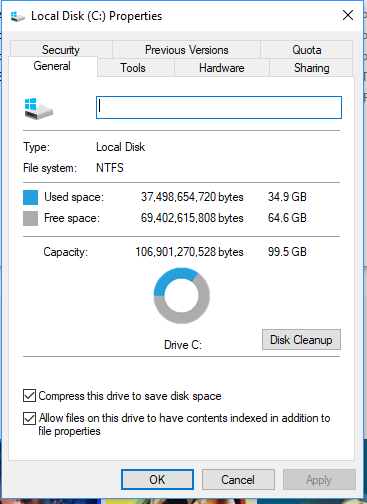
- When you create your initial base VM, inside the guest windows OS, right click on your C: drive and go to properties. Then click on “Compress this disk to save space”.
- Only install what you need as far as software. You can switch back to the host to do some things. For small applications that I use a lot, I just install them on the guest, so I don’t have to switch back and forth a lot.
- Avoid storing any unnecessary files on the VM’s disk If you want to have access to large files, you can create a folder on the host and share it with the guest. I don’t typically do that, but it is an option.
- Run CCleaner inside the VM periodically to clean up unused files.
- Run Windows disk cleanup. NOTE click on cleanup system files and it will allow you to remove any old Windows update files ( can save GBs)

- Run Windows defrag inside the VM.
- The above 3 steps will make the VM run faster. They will shrink and organize the contents of the virtual hdd file, but will not shrink the virtual hdd file itself.
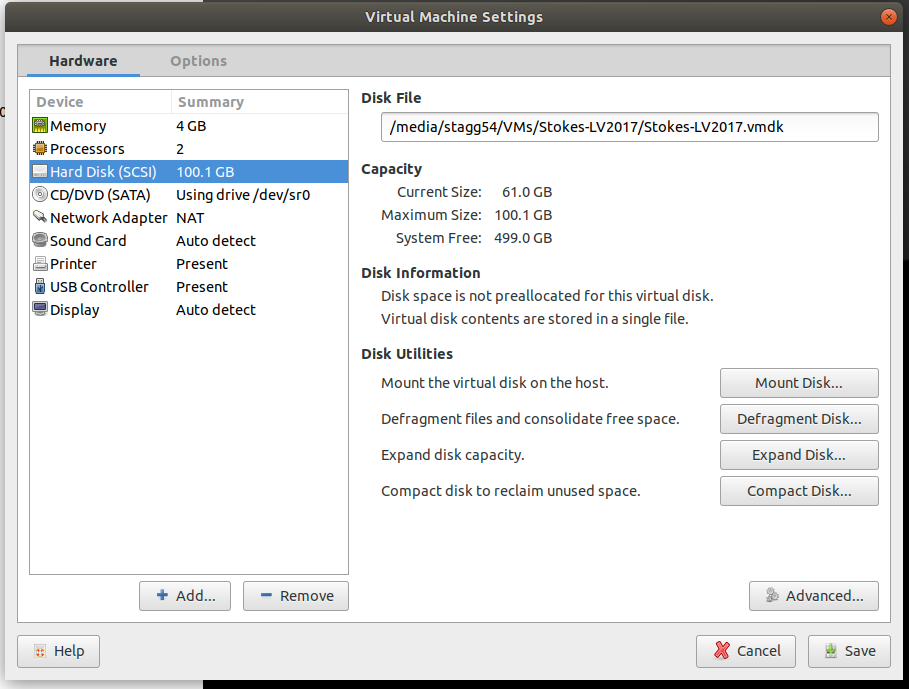
To shrink the virtual hdd file, inside VMWare with the VM shutdown, click on Virtual Machine Settings. Select the hard disk. There should be options to defrag the disk and then compact it. First defrag. Then compact. If you do this after the above steps this should shrink the virtual hdd file by GBs.

- If you want to get efficient with this you can script it all with a bash file using vmrun. For the things that happen inside the VM you can programmatically launch the VM and run a windows batch script inside it. If you are on linux just type vmrun and it will list all the options.
File Management
There are several ways to share and move files between the guest and host OS:
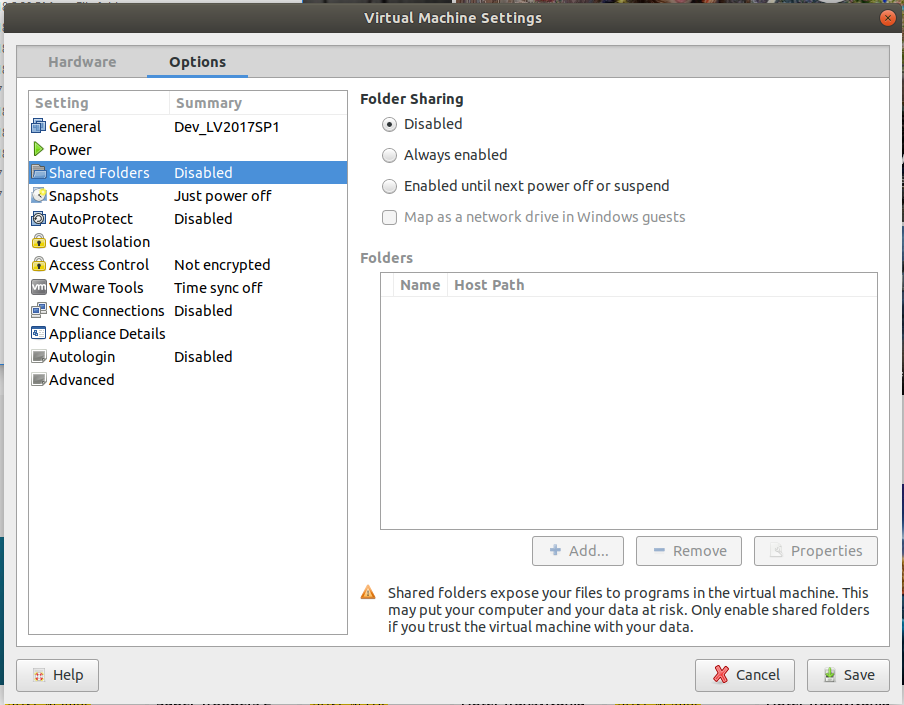
- Shares inside VMware – To set these up go to Virtual Machine Settings and click on Options. This takes an existing folder on the host and it shows up as a shared folder in the guest.
- Network Shares – You probably already have some of these.
- Dropbox or equivalent – This is useful if you have files you need to share with clients.
- Git or SVN – You should be using SCC for your source code.
- Simple Drag and Drop (depends on OS support and settings within the VM) – This super quick and easy for individual files.
- USB drives – You can toggle which OS it is connected to.
Backups
All of our source code is on a Gitlab server. Any other important documents reside on Nextcloud. We have a document for each project that lists all the software and drivers that need installed. If a VM crashes and burns irrecoverably, the only thing we really lost is any local changes that haven’t been pushed to Gitlab. We can easily recover by cloning an existing VM and reinstalling the project specific software. There may be a few configuration issues, but they are usually pretty minor. We can usually be back up and running in a few hours.
So we typically don’t back up our VMs. I do backup the base VM and each of the LV version VMs, but that’s it and that’s probably unnecessary. One thing we do though is at the end of a project when we finish it we archive it so that if we have to do a bug fix, we can just immediately start it up.
Accessing Hardware?
Accessing hardware within a VM is pretty easy as long as it is USB or Ethernet. For other things like PCI or PXI I haven’t really played with it. My recommendation would be to just simulate the device in MAX if you couldn’t pass it through.
In VMWare there is a setting on the USB controller to just automatically pass USB devices through. You can also manually select devices to pass through. I haven’t had an issue yet. One thing to note is that USB 3.0 is disabled by default. You have to enable it. For Windows 7 guests you have to install a special USB 3.0 driver. Just google it and you should come up with an answer.
Ethernet is pretty easy as well. There are several options for how the network card is set up in VMWare. The 2 important ones are NAT and Bridged. In NAT, the host acts as a NAT router, so the guest is on a different subnet as if it were behind a physical router. In bridged mode, it actually gets an IP address on the same subnet as the host. In general, either one should work. I stick to NAT unless I need to be on the same subnet as some device or if I need special ports opened and then I use bridged.
Getting Fancy with it
If you are interested in automating things you should lookup vmrun. It’s a command line interface for VMWare that let’s you do all kinds of stuff. Combine that with some basic bash scripting skills and you can do cool stuff like:
- Have a “one click” cloning process for VMs with the ability to pass in a list of software to install automatically (hint: use the NI batch installer to create silent installers).
- periodically launching a VM and running Windows update inside it, so you don’t have to wait forever next time you go to use it. NOTE: depending on your project you may want to just disable windows updates all together if you have real tight version control. It depends on what your deployed system is doing. You are balancing tight version control and exactly matching the deployed system with the added security that comes with Windows updates.
- periodically defrag and compress all your VMs.
Conclusion
Using VMs for LabVIEW development is very powerful. It can help you maintain isolation between all your projects and avoid driver conflicts. There is a slight learning curve and it introduces some overhead, but it is worth it. If you are not using them, I highly suggest you just dive right in and try it out. If you screw something up you can always just throw the machine away and start from scratch. Since VMWare is geared towards IT professionals, it has tons of useful features, such as snapshots, the vmrun command line interface and others you can explore to make yourself even more productive.
If you would like to learn more or need help managing Virtual Machines for your organization, schedule a free one-hour appointment.
