Git Basics

I am working on some new training material on git. I thought I would use a series of blog posts to kind explore some ideas and help clarify my thinking. Learning git can be difficult. I want this material to be approachable to beginners, yet still detailed enough that they have an understanding of what is going on rather than just memorizing some magical incantations. I also hope that it will be useful for people who are currently using git but feel like they don’t quite understand all of what is going on behind the scenes.
The fundamentals
To use git effectively, it really helps to understand a bit of it’s inner workings. Fully explaining the git object model (ie how it actually stores and indexes content) is beyond the scope of this article. If you are interested in that, there is a book that covers it quite well. That book covers more than you probably want or need to know. I feel like you can get away without understanding too much about the object model itself (blobs, trees, etc), but you certainly need to understand how the working copy and staging area work and what a commit graph represents along with the various references (HEAD, branches, tags). Understanding that will make everything else easier.
The working directory and index
To create a git repository, you typically use one of 2 commands git init or git clone. git init is used to create a local repository. You can run it in an empty directory or in a directory where you already have some files whose changes you would like to track. git clone is run when you have a remote repository (for example a Gitlab repository) that you want a local copy of.
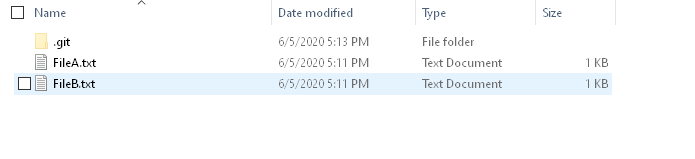
In any case, you will end up with a folder of files that includes a .git folder. It is hidden by default on Windows. Click on view to show hidden folders. Everything but the .git folder is your working copy. These are the files you are going to edit and keep a history of. This is your source code. The .git folder is your local copy of the repository. It contains the entire history of the project. Every time you revise a file and commit, it is stored in there.
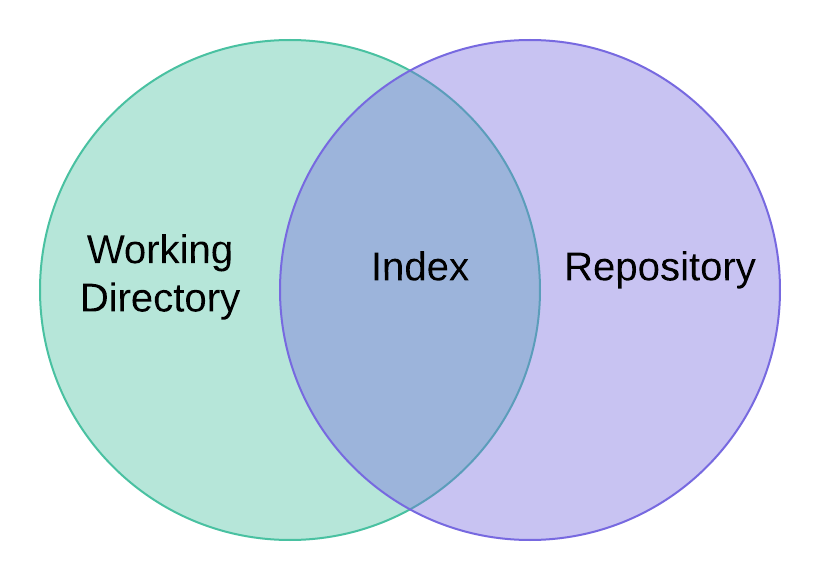
Capturing changes to the files in your working directory in git is a multistep process. The key to that multistep process is the index, sometimes also referred to as the staging area. It is important to understand how the working directory, index and repository all work together.
DISCLAIMER: I am overly simplifying this next section on purpose. I am trying to leave out how git actually stores and references content on disk (trees and blobs) to make it more understandable and shorter. If this seems a little murky and you really want to know how all this works, read this book.
The index is not a list of files to be added, rather it is the entire set of content that will form the next commit.
Let’s assume you used git init in an empty folder to create a blank repository. You add some files to your working directory. Now you want git to start tracking changes to them. The first step is to use the command git add to tell git that you want to start tracking these files. What that does behind the scenes is add those changes to the index. If we think of a commit as a snapshot, then the index is also a snapshot. This is an important notion. The index is not a list of files to be added, but is the entire set of content that will form the next commit. It is the same content as the original commit that we started from plus whatever changes we have told git to capture using the git add command. Then you would use the command git commit to take the snapshot that is the index and turn it into the next commit. That is why commits in git are so fast. It literally just takes the snapshot that was the index, adds some metadata to it and that becomes the next commit.
BEWARE: When you commit changes git does not look at the current state of your working directory. It only captures the state of your index. If you make a change to a file, add it to the index, but then change the file again, git commit won’t capture that second set of changes unless you specifically add the file again.
After you have added and committed all your files, the new commit in the repository, the index, and the working directory will all contain/point to the same content. This is the state you would be in if you cloned a repository. The best way to see what has been staged (added to the index) or not is with the git status command.
Git Status
So let’s make another commit and look at what happens using the git status command. Let’s start with a clean working directory (ie. all of our changes have been committed so the working directory, index and repository all match).

I have 2 files: FileA.txt and FileB.txt that already exist in the repository. Lets add a line to both of them. Then we will git add File A.txt to add it to the index (but not file B). We’ll also create a new file C in the working directory. Then let’s run git status again.
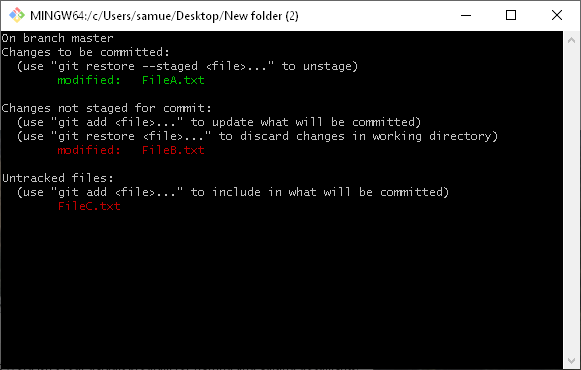
So what do we have here? FileA.txt is green. Git knows that it has been modified and since the changes have been added to the index, if we were to commit now, those changes would be captured. FileB.txt is red. Git knows that we have changed it (it doesn’t match what is in the index). It is red to warn us that if we were to commit now, we would not capture those changes because we have yet to add them. Similarly, git noticed that we added FileC.txt (it is not present in the index). Note: Git status also gives you some helpful hints on how to stage (add to the index) and unstage changes (remove from the index).
I encourage you to create a new throw away repository. Create some files, add, and modify them. Make a few commits. In between each action, call git status and see what changes. Try to reconcile the output of git status with your understanding of the Venn diagram above. It should eventually start to make more sense.
Why have the index at all?
It gives you some freedom. Say you are working on one change in one file and you happen to see something else that needs to be fixed in another file, so you fix it. Let’s assume the 2 changes are completely unrelated. You could just add them both and make one commit. However, it might make sense to make 2 separate commits since the changes are unrelated. Git gives you the freedom to do that. Simply add the first change and commit. Then add the second change and commit. If you do some research on git add -p you will see that can even choose to add only certain changes within an individual file (really only works on text files – not VIs)
If you want to make committing a one-step process you can. git commit -a will add any changes to tracked files (files that already exist inside the repository) BUT NOT untracked or new files and then immediately commit.
The Commit Graph
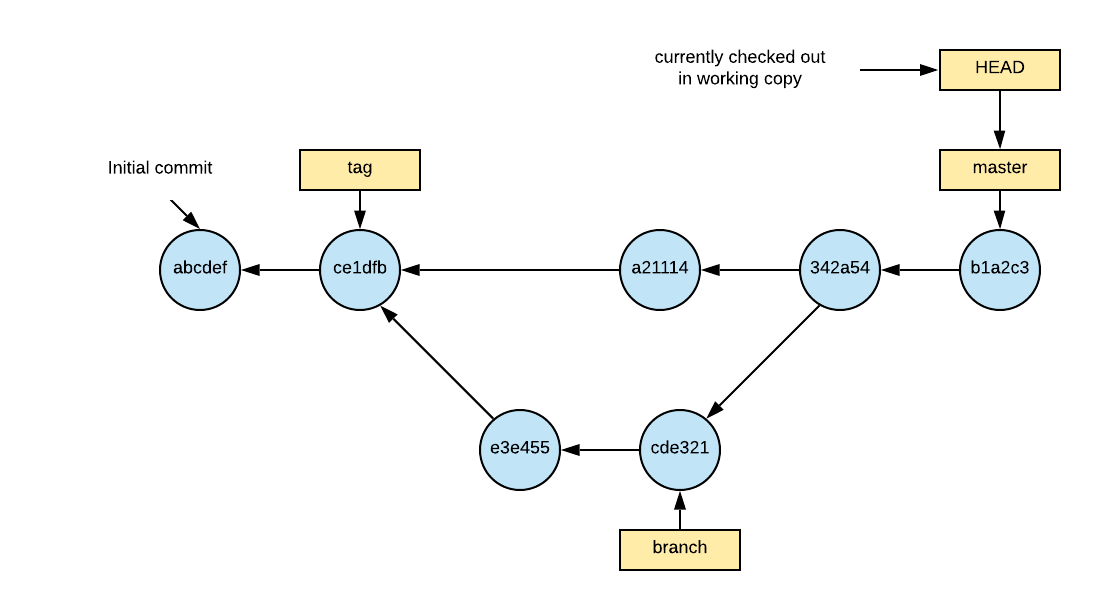
The commit graph can be really useful in visualizing the history of your project. It is also a very useful tool for visualizing the effects of various git commands like checkout or reset.

- Commit Graph (shown above) – shows the history of the project as a series of commits (the blue circles). The initial commit (abcdef) is on the left. Time flows roughly left to right. The commit on the right (b1a2c3) is the most recent commit. The arrows point from each commit to its parent commit(s). Starting at any commit, you can trace its history back to the initial commit by following the arrows.
- Commit – Each commit represents the state of the repository at that particular time. It is not a set of changes, but rather an entire snapshot of everything you are tracking in your working directory. It is labeled with an sha1 hash (in this case abbreviated to 6 digits). It also includes metadata such as the timestamp, author, a commit message and a reference to the parent commit(s). The sha1 hash is the result of a hash of all this information.
- HEAD – HEAD is the ref that points to where you currently are in the commit graph. The commit that it points to (often indirectly through a branch) is what is checked out in your working directory that you may or may not have modified.
- Branch – A branch is just a ref that points to a specific commit. When HEAD is pointing to a branch and you make a new commit, the branch is updated to point to the new commit. Branches can be named whatever you would like. The default branch is master. Typically branches are used for isolating work on a new feature or a bugfix.
- Tag – A tag is a ref, just like a branch, but it is fixed to always point to the same commit. Usually, it corresponds with a release version as in v1.0. These are useful for going back to a specific point in time.
This is the first of a series of articles on git. Eventually they will form the basis. Stay tuned for more information on that in the future.
