Easy VPN

VPN stands for Virtual Private Network. Why would you need one? Well, let’s backtrack to my previous post. My previous post was about how to setup a development server. It works great when I connect to it over my home LAN. Your home LAN, or local area network consists of all the computers/devices connected to your router (wired and wirelessly). However the next obvious question is how do I connect to it from outside my home LAN? For example while I’m on a customers site. A VPN allows me to connect to any computer (or virtual server) on my home LAN from anywhere with internet connectivity.
In this blog post, I’m going to talk about how to setup a simple VPN connection to your home network. It will utilize a program called OpenVPN, and we will run it on a virtual appliance using turnkey linux (see previous blogpost for more information about turnkey). They are an amazing resource and their free appliances typically work very well. However I have found that sometimes they can be a little tricky to set up (at least to get them to function the way I want them to function). That is why I’m writing this blogpost, in part to document what I am doing and in part so that others may benefit.
Networking Overview
First we need to review networking. If you are already an expert, you can jump ahead. This is a very brief (and rudimentary) overview. It’s obviously slightly more complicated than what I’m laying out here, so if you want to know more, a quick google search should produce more than enough information. As you may know every computer has an IP address. It’s kind of like a mailing address. It tells other computers where to deliver messages to it. There are basically 2 types, global addresses and local addresses. Think of it this way: A global address is like a street address for an apartment building, while a local address would be the apartment number within the building. In terms of your local LAN, your router has a global IP address and all your devices are given a local address by your router.
So when a local device wants to communicate with the outside world, it sends a message through the router which sends it to the correct global IP address (all your www.google.com, etc URLS get translated into an IP address). The global IP address then sends a response to the global IP address of your router (it doesn’t know anything about the local IP address system). The router then routes the response to the correct local device. The router is acting as a gateway connecting your inner local network to the greater internet.
When a local computer talks to another local computer, it sends a message through the router, which sees that it is destined for a local address and forwards it to the correct local device. The same thing happens to the return message.
DNS and Dynamic DNS
DNS stands for Dynamic Name Service. If you recall above I mentioned that URLS like www.google.com get translated into an IP address. DNS servers are what do that translation. A DNS server contains a lookup table that links each Fully Qualified Domain Name into an IP Address. That way you don’t have to remember the IP address for google, facebook, twitter, or whatever your favorite site is.
The first step in accessing your home network from the outside world using a VPN or any method is to know it’s IP address (ie. the global IP address of your router). One way to figure this out is by typing “What is my IP address?” into google. Unfortunately for most home internet services, the global IP address of your router is not fixed. Your ISP randomly assigns your router an IP address and that can change over time. So one way of dealing with this problem is to use a dynamic DNS service. It keeps track of the changing IP address for you and gives you a URL that you can use that will always point to your routers global IP. I personally use duckdns, but there are other services out there. Often a router comes with pre-installed Dynamic DNS support – check your routers documentation. Dynamic DNS works by running a script on a machine inside your network which detects your routers global IP address and sends an update to the Dynamic DNS service.
Port forwarding
Using a VPN is a great way to access your network, but its not the only way. There is a method called port forwarding. Remember that external devices only know the IP address of the router. For example say I want to access my server, whose local IP is 192.168.0.10. If I type that into my web browser, whatever router I’m connected to will recognize that as a local IP address (10.x.x.x and 192.168.x.x are reserved for local addresses), and will forward it on the local network only. If I’m inside my home LAN, then all is well, but if I’m outside, then I’m not going to be talking to my server, but rather the local device (if it exists) with that local IP address.
Portforwarding is a way to use your router’s global IP address to access a service on one of your local computers. First we need to address the subject of ports. A Port is like a mailbox slot. Every IP address has a whole bunch of numbered ports attached to it. Different services on the computer listen for messages on different ports. For example, http uses port 80, https uses port 443, ssh uses port 22, etc. Portforwarding is setup on your router (see portforward.com for directions for your specific router) and says that whenever the router recieves a message from the outside world on a certain port to forward it to a specified computer on your internal network. So to send a message to a server on my internal network on port 22, I just send it to my router on port 22 (using the router’s global IP address) and if port forwarding is set up correctly, it will arrive at my internal server on port 22.
Why VPN and not port forwarding?
Portforwarding has a few disadvantages:
- Overhead. You have to open a port for each service you want to access from outside, this is a tedious task. Everytime you add a new service, you have to remember to forward the ports. And if you decide to stop using it, then you have to remember to go back and remove it from the port forwarding list, so the port is not sitting there open, which could compromise security.
- Less Security. The more ports you have open, the more chances for an attacker to compromise your systems. A port is basically a way for attackers to send malicious messages and data into your local network.
- Port conflicts. You can only forward a port to one specific computer on your local network, so if you want to have 2 webservers running, then you have to force one to run on a different port
In Contrast, with VPN:
- Single Port. You are only required to open up a single port for the VPN connection, and you are only required to do this once. When you add a new service, there is no need to forward another port.
- More Secure. There is only 1 port and all VPN traffic is encrypted, so it is much harder for attackers to break in. Also VPN lets you encrypt normal internet traffic when it is routed through your VPN. This lets you browse the internet at the local coffee shop without worrying about people sniffing your internet traffic.
- Access to all services. Once you are connected to the VPN, it is as if your laptop is plugged directly into your router. You can access any service normally available on your home LAN.
Avoiding IP conflicts
We are almost ready to setup a VPN, but there is one more topic that needs addressed and that is IP address conflicts. When a computer connects to your router, the router assigns it an IP address (a local address). Every computer on your LAN has a unique IP address. Your router has a limited pool of IP address to assign. The same way, when your laptop connects to a VPN, the VPN assigns it an IP address from a pool of IP addresses. But it also has an IP address for the local network that is connected to at the coffeeshop or at your client’s site or wherever you happen to be accessing the internet from. All of the other computers on that network also have a local IP address. All of these IP address pools need to be seperate, so there is no possibility for confusion.
For example, on most routers the preconfigured IP pool is 192.168.0.x. The routers local address is usually 192.168.0.1 So if you want to talk to your router to configure it, if you are on the local network, you type 192.168.0.1 into your browser to connect to it. So you go to a coffee shop and connect to its wireless network and then connect to the VPN. What happens when you type in 192.168.0.1? That depends on the coffee shops router. If it’s local IP address is 192.168.0.1, now you have a conflict. You computer doesn’t know which one to connect to.
You can’t control how the coffee shops router is configured. There is always a possibility for conflict, but there is an easy way to make it much less likely. Change your router’s (and your VPN) preconfigured IP pool to something else other than the defaults. The most common local addresses are 192.168.0.x and 10.0.0.x, so pick something else. Look at your routers documentation on how to do this. For the VPN, you get to pick the IP pool during the openvpn setup. The setup routine automatically generates a random IP pool, which you can change if you wish.
First Step Dynamic DNS
As mentioned above, the first step to accessing your home network via VPN is to set up a dynamic dns service. I use duckdns, but there are others. Some routers have built in dynamic dns support, so check your router’s documentation. You will need your FQDN (Fully Qualified Domain Name) for setting up the server. It will show up in the authentication certificates we are going to generate.
Setting up the server
In order to connect to your vpn, you must have a VPN server setup inside your home LAN. See the previous blogpost for more information on TurnKey Linux and virtual appliances. Download the turnkey virtual openvpn appliance and open it in VirtualBox. Go through the configuration. Enter your FQDN from your dynamic DNS service when asked. Use the randomly generated IP pool or use your own. Set a static IP address for your server. Do the updates, and reboot.
Setting up Timezone
While not 100% required, this step can save you a lot of headaches. The reason this causes headaches is the next step which involves generating authentication certicates. If you generate them with the default timezone, UTC, at say 5pm, then the certificates will be valid at 5pm local time. this is because when the clients check the timestamp, they don’t the timezone into account. The should, but they don’t. So if you skip this step, then your certs won’t be valid for several hours.
From the commandline on your server, type in date and you will see that the timezone is set to UTC. Use dpkg-reconfigure tzdata to bring up a dialog which lets you chose the correct timezone.
Creating Keys
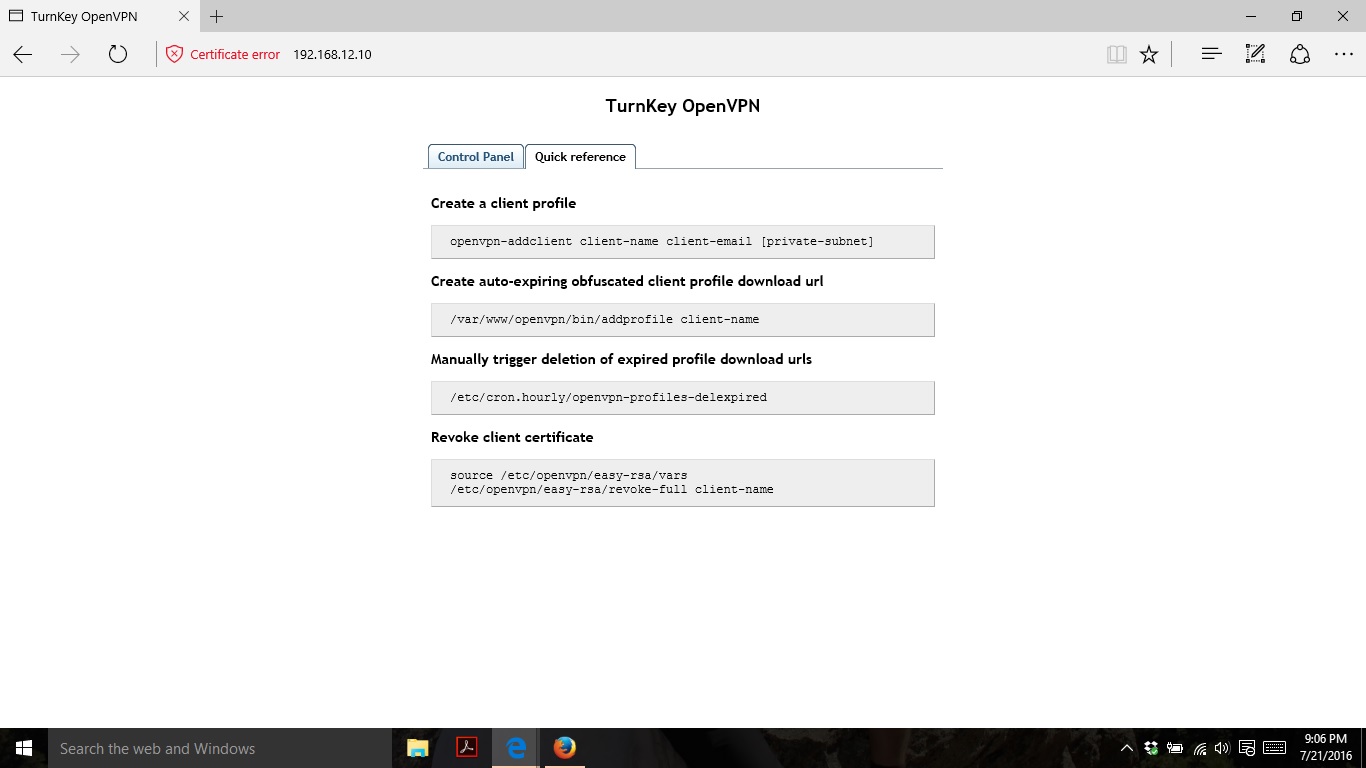
If you go to https://openvpnserverip it will bring a webpage that looks like the one shown below. Click on the Quick reference tab and it will show you some common commands including the command to generate a client cert, which we are going to do now. Make a note of the command.
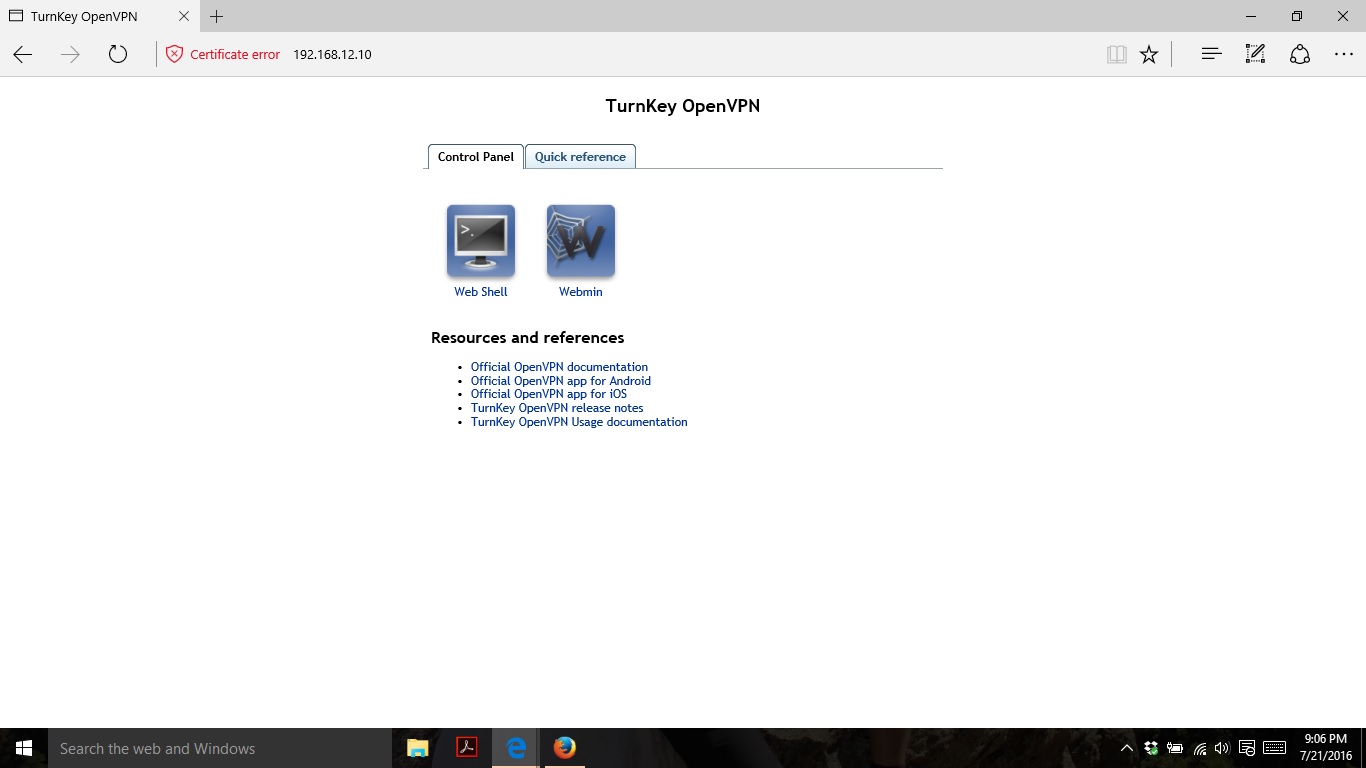
Now, go to the command line. You can quickly do this by switching back to the control panel tab and clicking on the WebShell Icon. Use the command openvpn-addclient client-name client-email. Give the client a unique name. For example Sam-iphone. Then replace client e-mail with an e-mail address to associate with the cert. Hit enter and it will generate the appropriate certs. If it asks you about signing and commiting, say yes. The necessary files will show up in /etc/openvpn/easy-rsa/keys It will also create a file named client-name.ovpn This .ovpn file is what you need to then copy onto each client. It contains all the information necessary for the client to connect to the server. Guard this file carefully. Anyone who has access to this file, has access to your VPN and through that to your entire network. Be warned. Repeat this process to generate one key for each client. You can repeat this process and add more at any time in the future.
Installing clients
Now you must go install the openvpn client software on each client. In my case, I had a Windows 10 laptop and an iphone. For the iphone, go to the app store and for Windows 10 you can just download the client from the openvpn website.
Moving Keys to clients
So we need to be careful with the keys (ie. the .ovpn files). I used winscp to transfer the files from the server to my laptop. From there I moved the .ovpn file for my laptop to the C:\Program Files\OpenVPN\config\ directory. For my iphone I used iTunes to transfer the file. Another option is to use the command line and generate a website with a QR code link. Type the server’s ip into your internet browser and then click on the quick reference tab for details. This command provides the html link. Open that in a browser and then use a QR scanner on your iphone. The QR code will provide the download link. However it uses the FQDN, and we haven’t set up port forwarding yet. So if your iphone is on your LAN, just change out the FQDN for the local IP addres and it should work. Once it downloads, it should automatically open in the openvpn app.
Port Forwarding
We are getting closer, but not quite done yet. In order to access our VPN server to setup our VPN from outside our LAN, we need to set up port forwarding. Again, go to portforwarding.com and look up directions for your specific router. We need to forward 1194 to the local IP address for your OpenVPN server.
Adding access to other computers on your home LAN
Right now, you could connect to your VPN. Everything is set up to connect your laptop or remote device to the openvpn server running inside your local LAN. However, you will not be able to access any other computers inside your LAN yet. There are 2 more steps to enable that. Right now you have 2 seperate networks. You have the VPN network and the LAN network. You need to enable them to talk to each other.
On the openvpn server, pull up the command line. Use nano to edit the /etc/openvpn/server.conf file. Add a line at the bottom push “route 192.168.0.0 255.255.255.0” . Where 192.168.0.0 is your local network. For example if your local IP pool was 10.5.4.x, then you would put 10.5.4.0 It should always end in 0. This makes your VPN client (your remote laptop) aware that the LAN pool of IP addresses exist. Save the file and the restart the openvpn server using /etc/init.d/openvpn restart.
That will get message from your remote machine to your LAN. But now you need to configure your router to return messages. This will depend on your router. You basically want to direct any traffic to the VPN subnet to the VPN server (but using its gateway address on the VPN) Sorry I can’t be of more help, but if you’ve made it this far you can probably figure it out with a little help from google.
Testing
All that’s left now is testing. If you did everything correctly, it should all work. You should be able to use the client to connect to the VPN and you should be able to access all your LAN devices using their local IP address. The clients usually give pretty good diagnostic information. You can add a line to the server.conf file on the server to create a logfile there. Add log pathtologfile . Make sure to create the file first using touch and then restart the openvpn server using init.d
